Option Groups are choices tied to any item. Example: if you are selling ice cream as dessert, then the client can choose between these flavours: chocolate, vanilla, strawberry or combination of them. They are all options. The combination of chocolate and vanilla can be a more expensive option than the simple vanilla. Your client can choose their favourite option (flavour) and the price will reflect that.
Modifier Groups are additions, modifications or exclusions that you can add to any item. Example: client can choose the chocolate ice cream, but he wants toppings. Toppings like: shaved chocolate, caramel sauce or sprinkles, are the modifiers. You can set their price and configure them easily.
Below is a step by step guide on how to create option groups and modifier groups and how to add them to items:
How to create an Option Group
[1] Log into Figure Manage website and go to Management -> Items & Categories
[2] Go to Options tabs
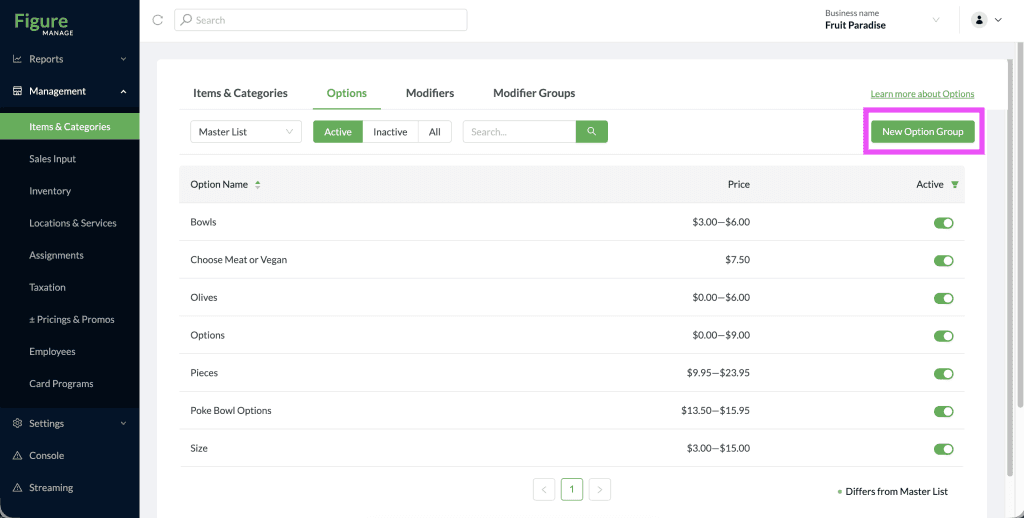
[3] Click on New Option Group
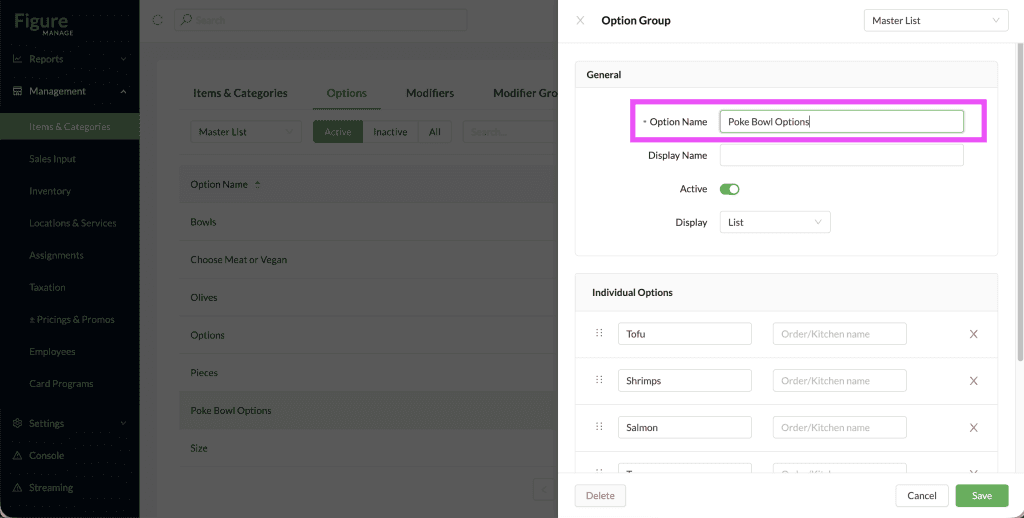
[4] Insert Option Name
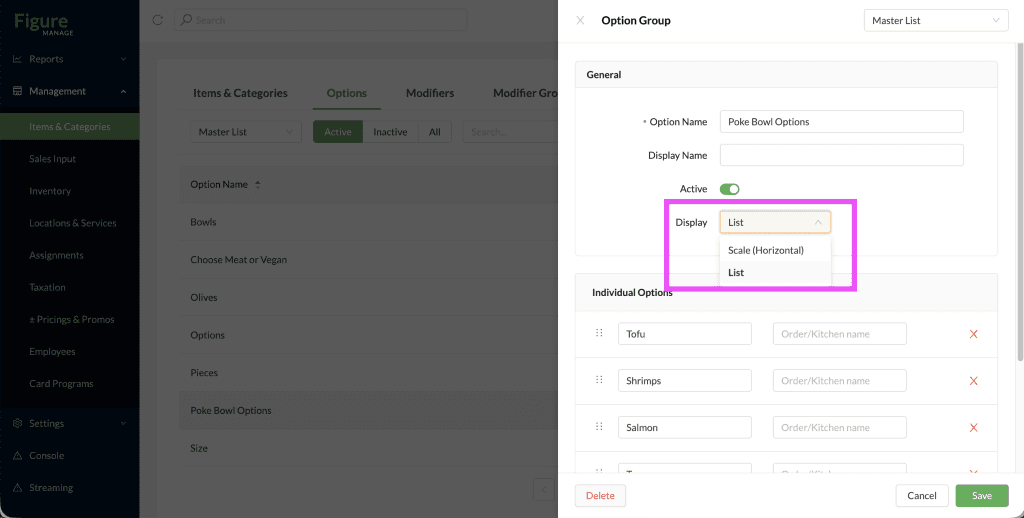
[5] Configure how the options will be displayed in POS – List or Scale (Horizontal) view
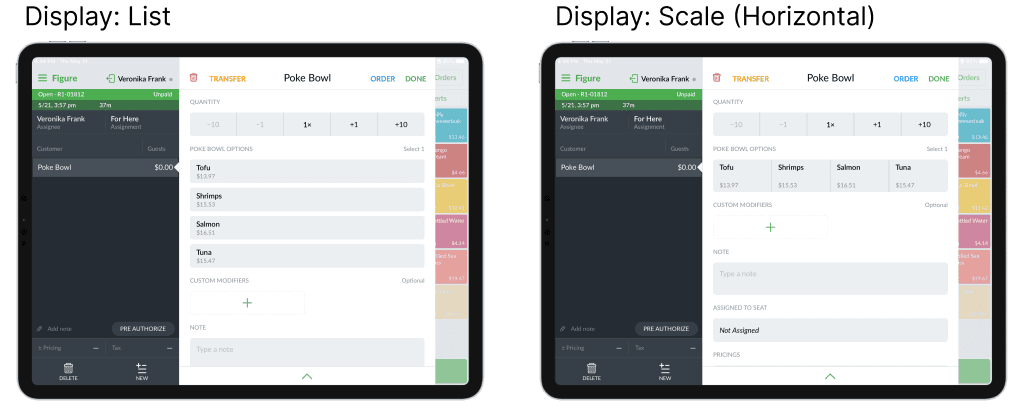
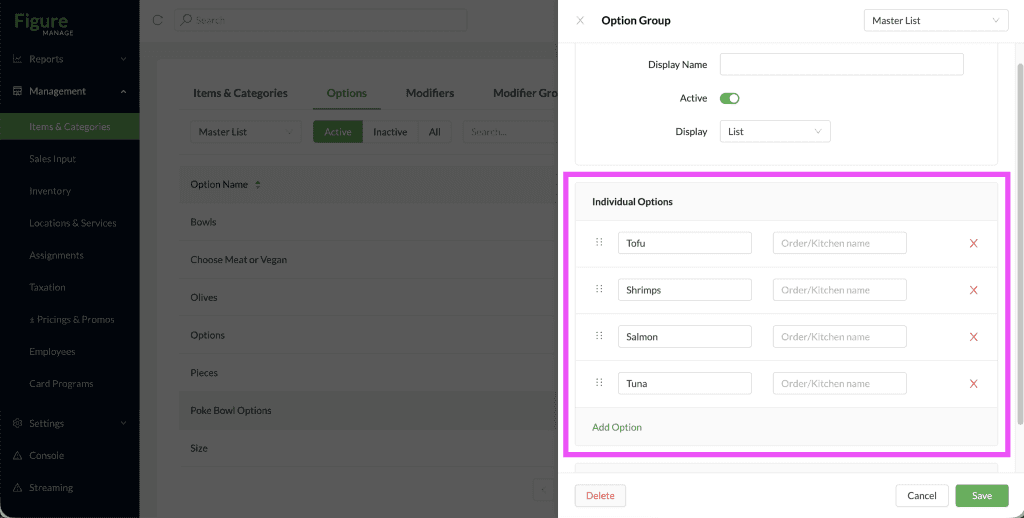
[6] Add Options
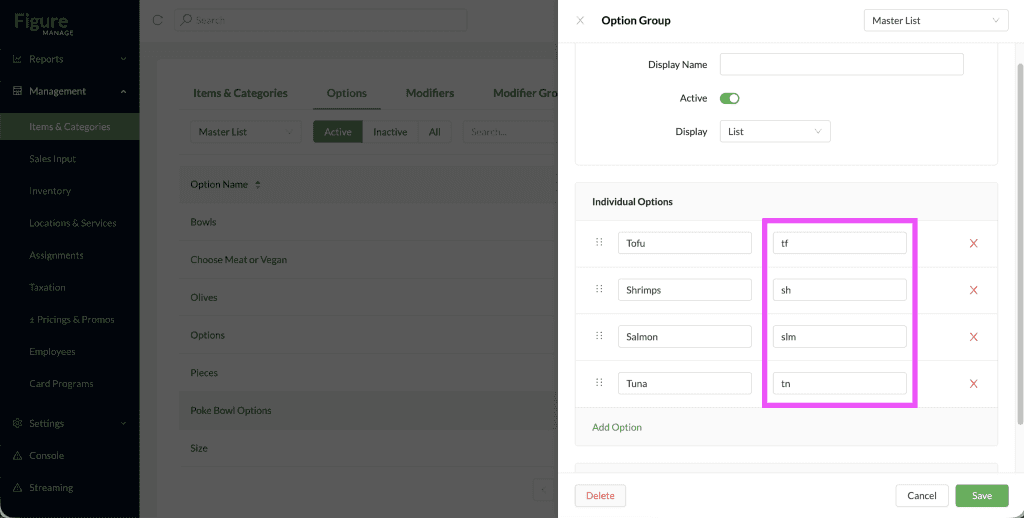
[7] If preferred, add kitchen name for the Options
[8] Click on Save
How to add Options to items
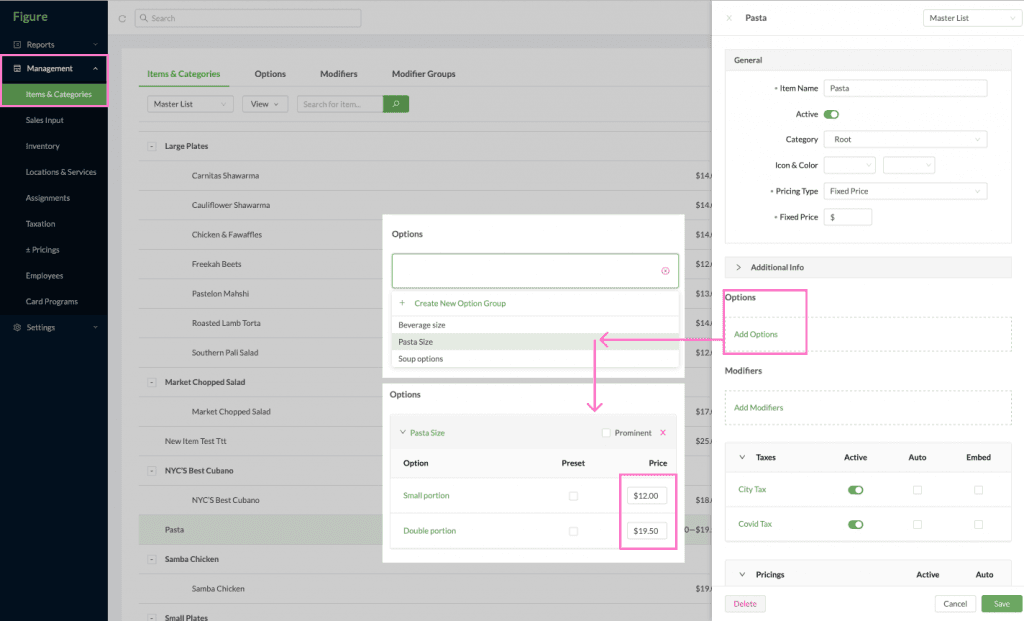
[1] Go to Management -> Items & Categories tab
[2] Choose Pricing Type “Set in Options”
[3] Add the Option Group you just created
[4] Set Prices for the Options
[5] Click On Save
How to create individual Modifiers
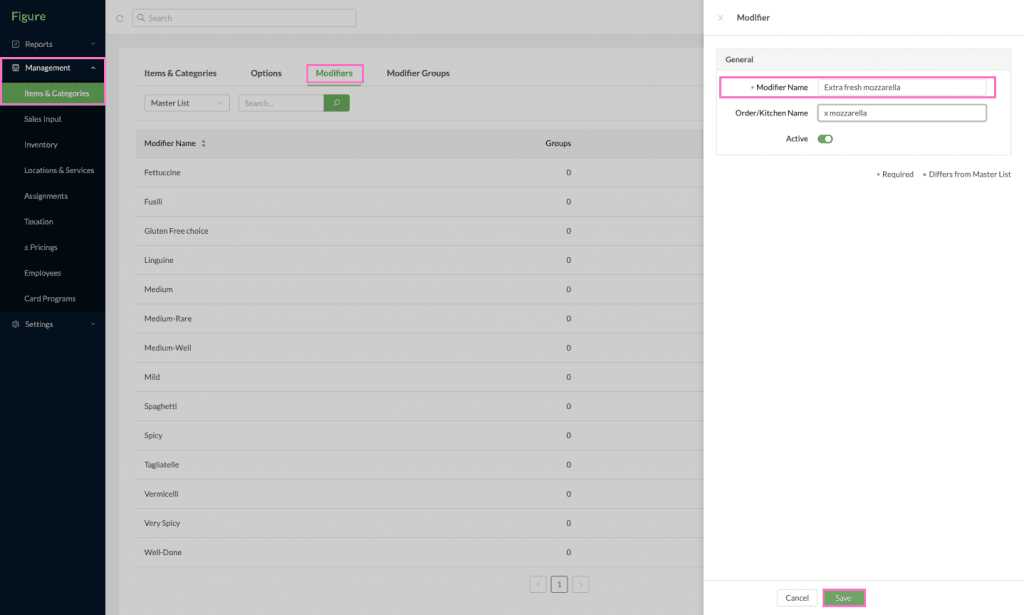
[1] Go to Management -> Items & Categories
[2] Go to Modifiers tab
[3] Click on New Modifier button
[4] Write Modifier Name. If preferred, add kitchen name for that modifier.
[5] Click on Save
[6] Add as many Modifiers as you need. Then add them to a group
How to create Modifier Groups
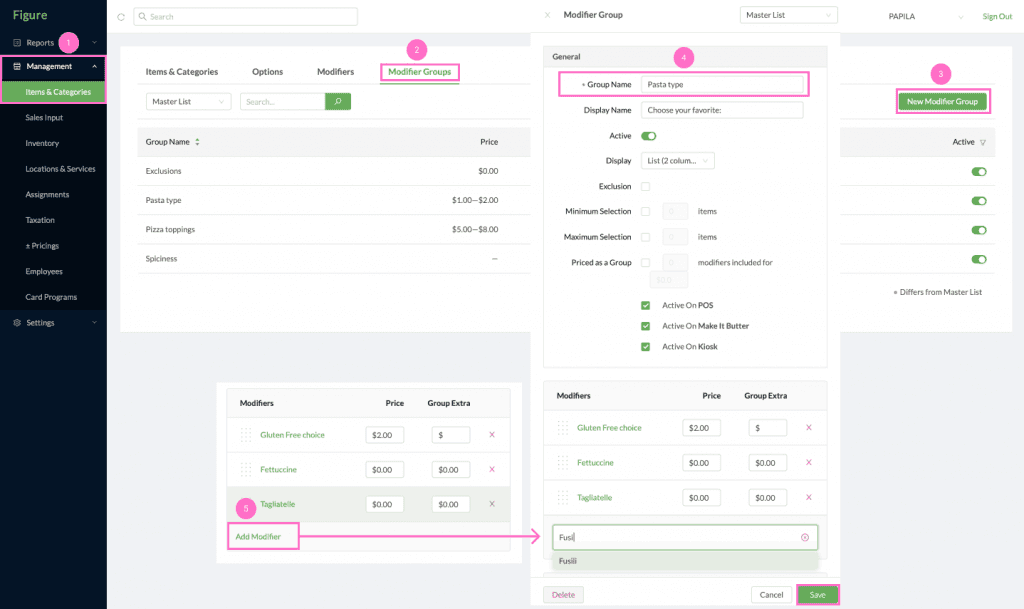
[1] Go to Modifier Groups tab
[2] Click on New Modifier Group
[3] Add Group Name
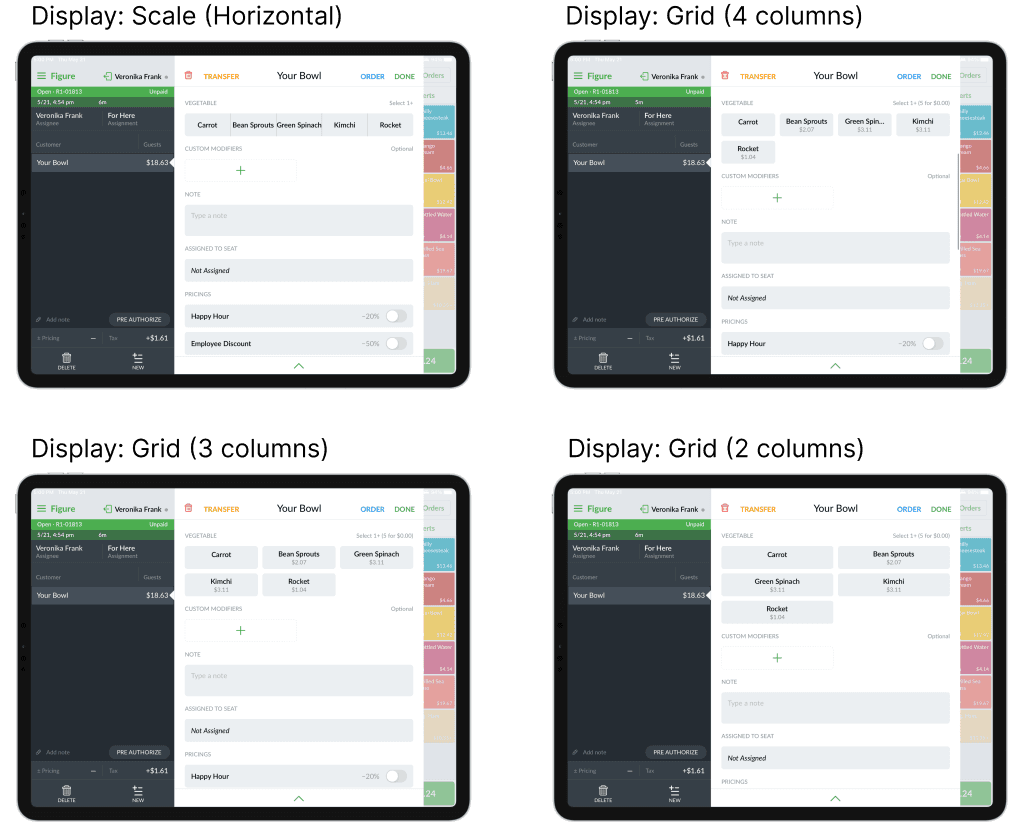
[4] Select the way the modifiers should be displayed in POS:
Scale (Horizontal)
Grid (2 columns)
Grid (3 columns)
Grid (4 columns)
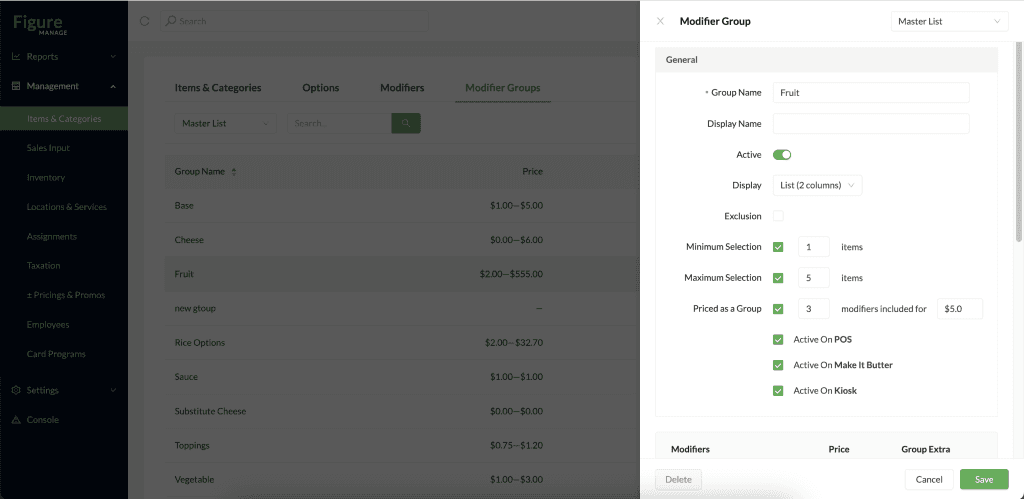
[5] Choose the kind of modifier group: exclusions / maximum or minimum modifiers / priced as group
Exclusion = items that customers can choose to exclude from their meals
Minimum Selection = require to select minimum amount
Maximum Selection = require to select maximum amount
Priced as Group = modifiers can be offered as a group of modifiers up to selected amount for one price
In the example below, customers can choose up to 1 - 5 modifiers, up to 3 modifiers, the price for the whole modifier group will be $5.
[6] Add the individual Modifiers you just created andassign prices to them
Price = a price of a modifier that is used when the modifier is selected
Group Extra = is the price applied when the modifier group is set to "Priced as a Group" and a user selects an additional modifier beyond the group’s maximum limit. For example, if the maximum number of modifiers allowed in the group is three and a user selects a fourth modifier, this extra modifier would be priced using the Group Extra price.
[7] Click on Save
You just created a modifier group that you can add to any item.
How to Duplicate a Modifier Group
Managing complex menus is now faster with the Duplicate feature. Instead of rebuilding similar lists from scratch, you can clone an entire modifier group – including all individual modifiers, prices, and rules, except assigned items – with a single click.
[1 ] Log in to Figure Manage and navigate Items & Categories > Modifier Groups list.
[2] Click on the group you wish to copy to open the Modifier Group Details.
[3] Scroll to the bottom of the page and click the Duplicate button.
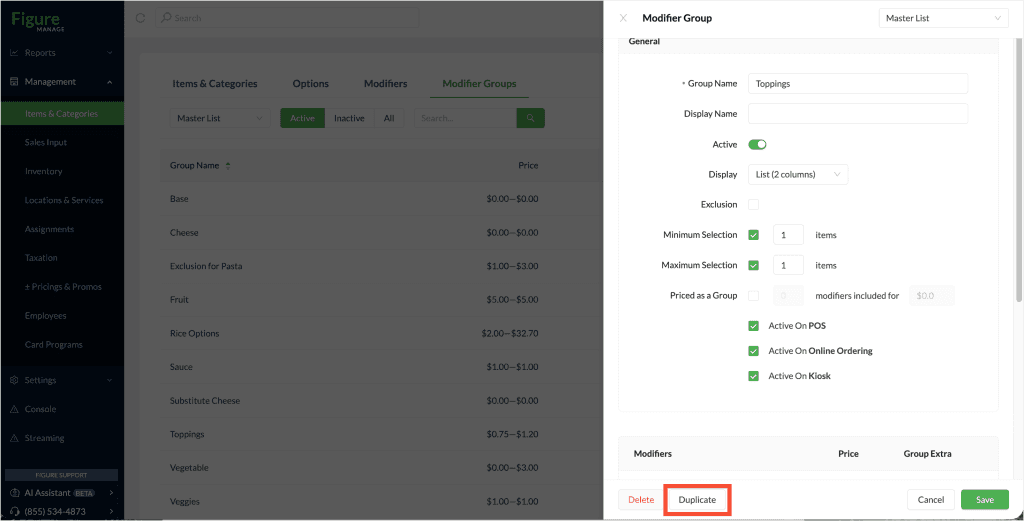
[4] Instant Edit Mode: A new group is created immediately and automatically opens on your screen.
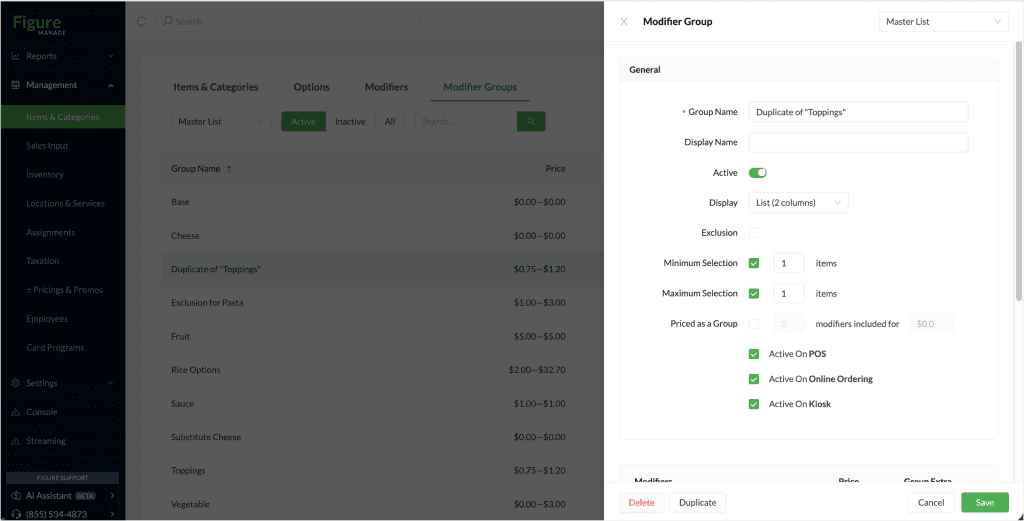
Customizing the Duplicate
Since the new group opens automatically, you can immediately begin your adjustments:
Rename: Update the group name (e.g., changing "Duplicate of Cheese Types" to "Premium Cheeses").
Refine Modifiers: Quickly swap out items or update pricing. All modifiers from the original group are already there, so you only need to change what’s different.
Assign: Don't forget to link this new group to the appropriate menu items before hitting Save.
Connecting Modifier Groups and Items
In Figure Manage, you can link modifier groups and items in two different ways – giving you flexibility in how you organize your menu.
From the item detail: Add modifier groups directly to an individual item.
From the modifier group detail: Add items to a modifier group.
1. Add Modifier Groups to an Item
Use this method when you’re creating a new item and want to attach modifier groups right away.
[1] Go to Management > Items & Categories
[2] Click on an item you want to add the Modifier Group to
[3] Click on Add Modifiers
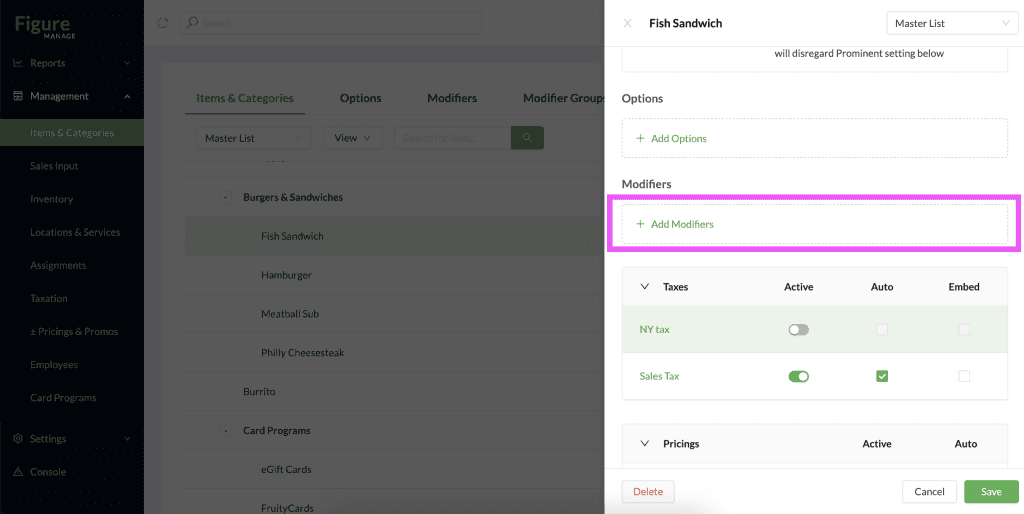
[4] Add the Modifier group you've just created
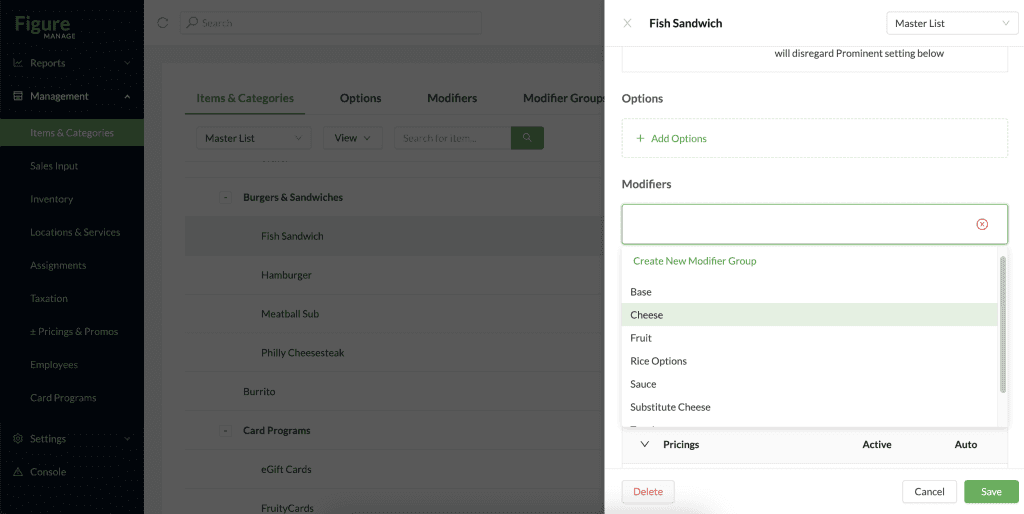
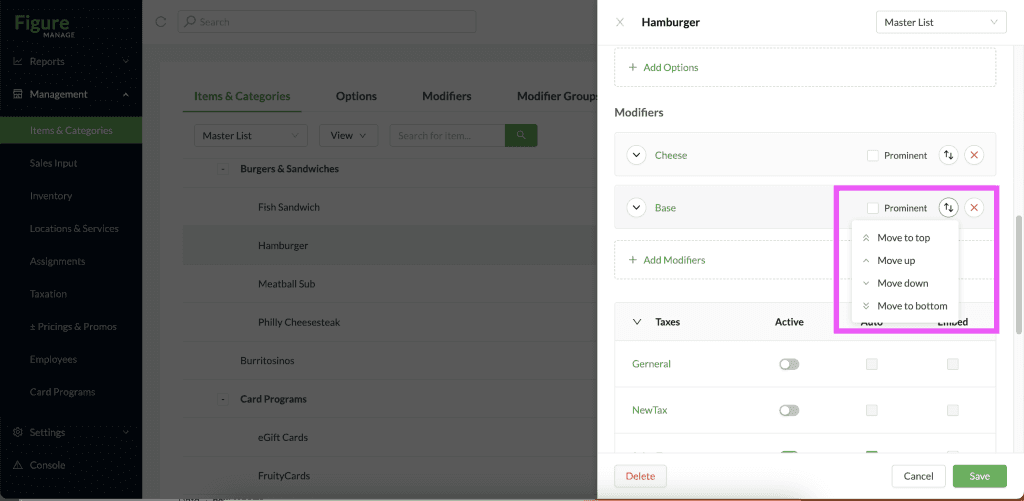
You can add multiple Modifier Groups to an item. After adding them, you can adjust their order using the arrows icon – move a group to the top, bottom, or shift it up or down one level as needed.
The order you set here determines how the modifier groups will appear in Make It Butter, POS, and Kiosk.
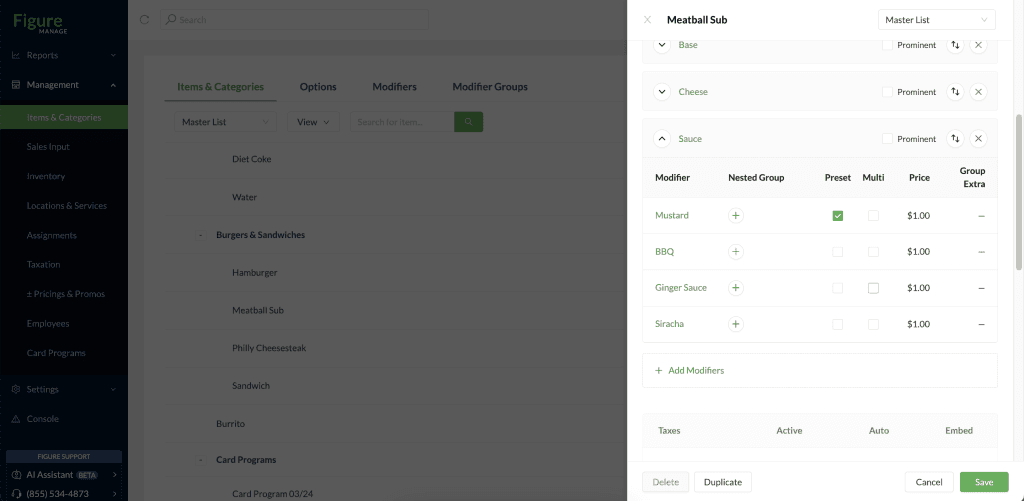
[5] After adding a Modifier Group to an item, you can configure additional settings:
At the Group level:
Prominent: Makes the modifier group appear first when selecting the item in the POS.
At the Modifier level:
Preset: Automatically selects this modifier by default. If a customer does not want it, they can deselect it.
Multi: Allows the customer to select multiple instances of this modifier (e.g., 2x, 3x, 4x, etc.), the price will increase accordingly
[6] Click On Save
2. Add Items to a Modifier Group
With this option, you can simply select all the items you want to include when creating or editing a modifier group – no need to open each item one by one.
[1] Go to Management > Items & Categories > Modifier Groups
[2] Open an existing Modifier Group or create a new one you want to assign to items.
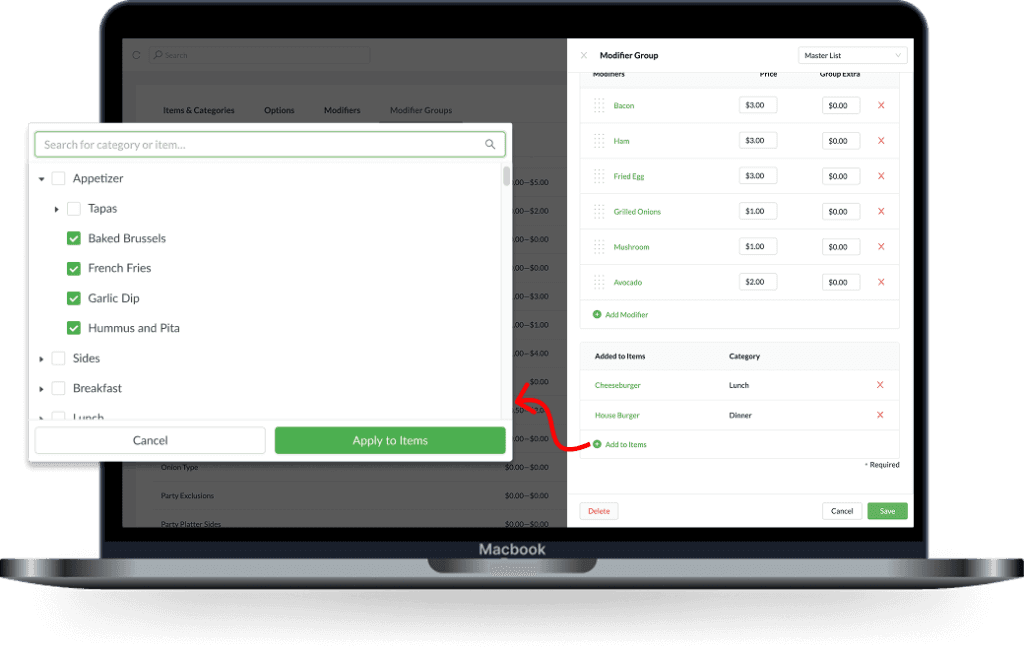
[3] At the bottom, in the Added to Items section, click Add to Items and select the items you’d like to assign this Modifier Group to.
[4] Click Save
Nested Modifiers
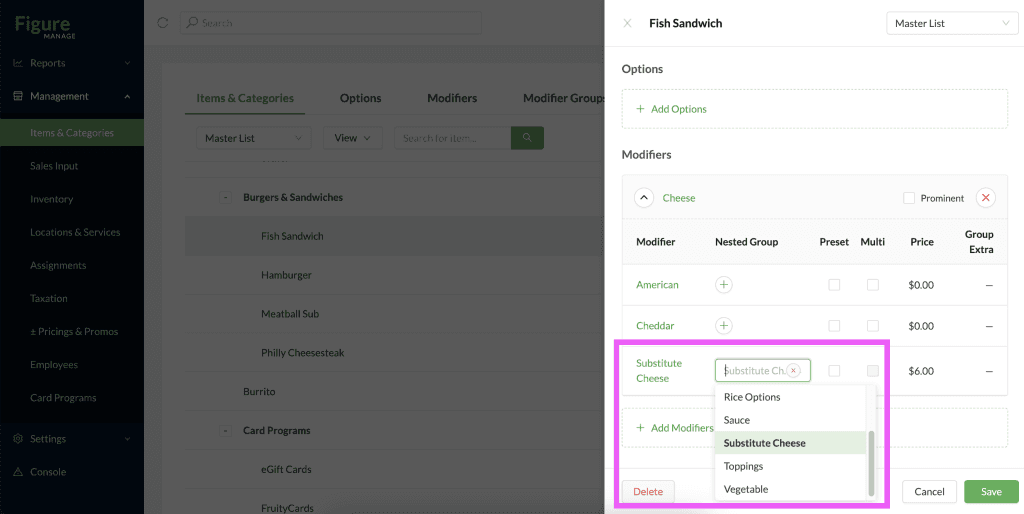
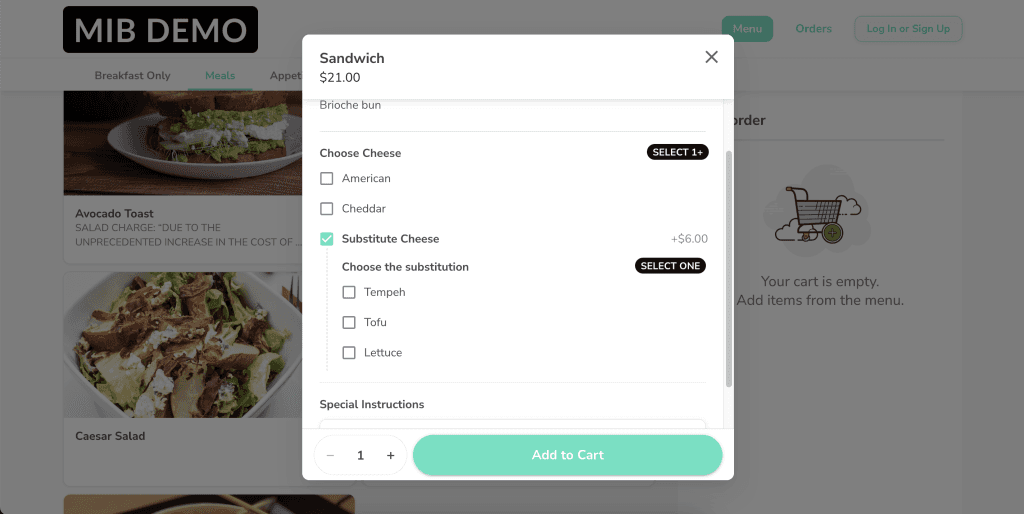
A Modifier Group can be added to an individual modifier in order to specify that modifier. This can be done by clicking the + button by a modifier and choosing the modifier group. See the example below.
This is how nested modifiers are displayed on Make It Butter:
Highlight Modifiers on the Kitchen Receipt
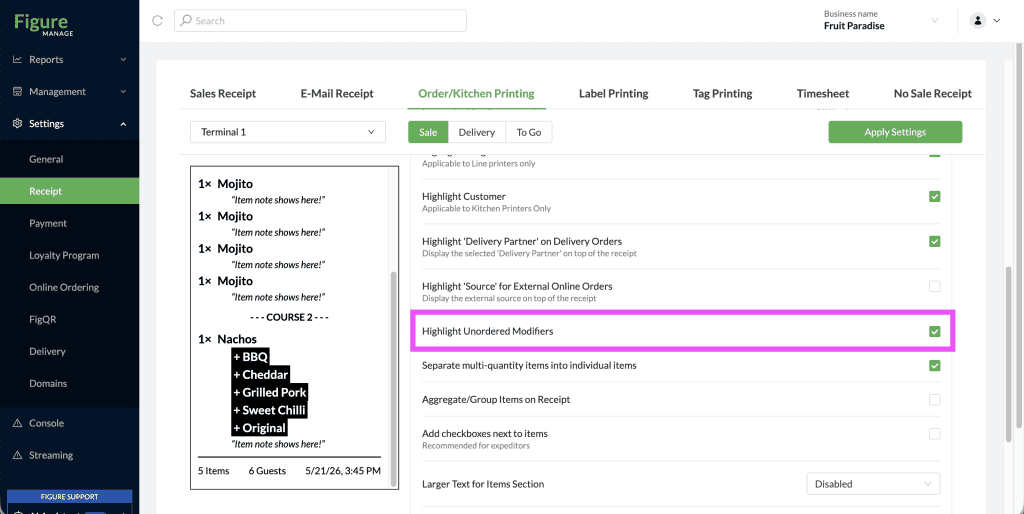
Enable the "Highlight Unordered Modifiers" setting in Figure Manage > Settings > Receipt > Kitchen/Order Printing to highlight modifiers on the receipt that were not previously ordered.
Efficiency Tips
How to Duplicate a Modifier, Option or a Modifier Group
Managing complex menus is now faster with the Duplicate feature. Instead of rebuilding similar lists from scratch, you can clone an entire modifier group – including all individual modifiers, prices, and rules, except assigned items – with a single click.
[1 ] Log in to Figure Manage and navigate Items & Categories > Modifiers / Options / Modifier Groups list.
[2] Click on the modifier / option / modifier group you wish to copy to open the detail.
[3] Scroll to the bottom of the page and click the Duplicate button.
[4] Instant Edit Mode: A new option / modifier / modifier group is created immediately and automatically opens on your screen.
Customizing the Duplicate
Since the new option / modifier / modifier group opens automatically, you can immediately begin your adjustments:
Rename: Update the name (e.g., changing "Duplicate of Cheese Types" to "Premium Cheeses").
Refine Modifiers: Quickly swap out items or update pricing. For Modifier Groups, all modifiers from the original group are already there, so you only need to change what’s different.
Assign: Don't forget to link the new modifiers to a modifier group and modifier groups and options appropriate menu items before hitting Save.
How to Bulk Delete a Modifiers, Options or a Modifier Groups
You can easily bulk delete Modifiers, Options or a Modifier Groups.
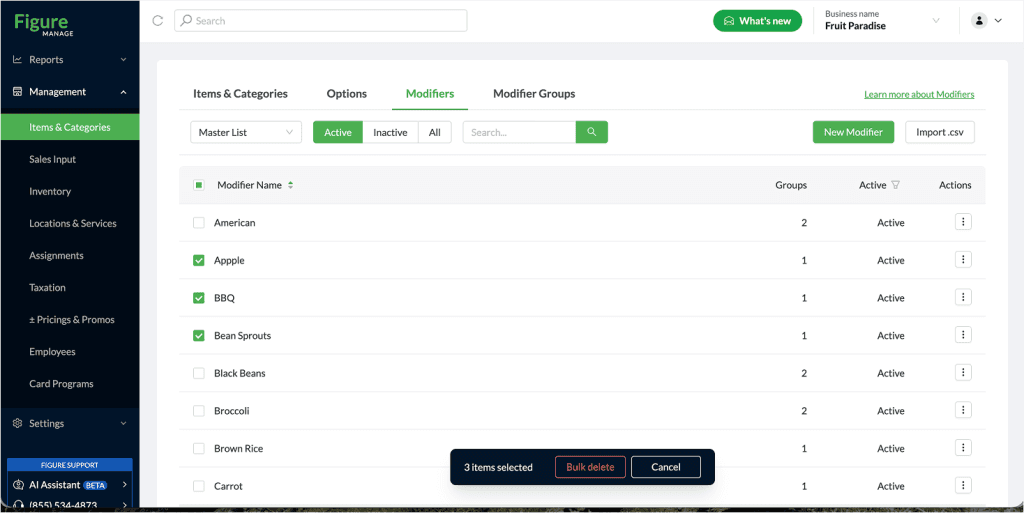
To bulk delete modifiers, select the checkbox next to each modifier you want to delete. Once one or more modifiers are selected, a bulk action bar appears at the bottom of the screen. Click Bulk delete to delete all selected modifiers at once.