Daily Operations in Figure POS

Jin Woo Park
Founder & CEO
Use this guide to sign in, take orders, send to kitchen, process payments and splits, find orders, issue refunds, and adjust tips.
Related Figure products

Overview
Use this guide to sign in, take orders, send to kitchen, process payments and splits, find orders, issue refunds, and adjust tips.
Step 1: Sign In and Roles
Employees sign in with a 4–6 digit PIN tied to role permissions.
Optional: clock in/out on the login screen; select position if you have multiple roles.
Manage roles/permissions in the back office at figurpos.com.
Step 2: Default Screens
Menu: fastest for order entry on sign‑in.
Layout: floor plan (if enabled).
Orders: list of paid and unpaid orders.
Start a new order anytime via New (returns to Menu).
Step 3: Order Details Panel
Key fields:
Order number (use for back‑office lookup; also prints under the total).
Created date/time and elapsed time.
Assignee (who the order is currently assigned to; change if needed).
Assignment (delivery, to‑go, here, catering, or custom; table auto‑fills if using Layout).
Customer: attach/search by name/phone/email; create temp customers or new records.
Guest count and auto‑gratuity threshold (configurable).
Step 4: Add Items and Modifiers
Tap categories (e.g., Appetizers) to add items.
Pre‑programmed modifiers streamline choices; only relevant modifiers appear.
Use custom additions for special requests and charge accordingly.
Gestures:
Swipe L→R = increase quantity; R→L = decrease/delete.
Tap‑and‑hold = duplicate item (copies modifiers); edit if needed.
Step 5: Send to Kitchen and Status Colors
Tap Order (bottom middle) to send; unsent items are white, sent items turn blue.
If an item turns gray, it did not route to a printer—check destination.
Step 6: Present Check and Take Payment
Print to present the check.
Charge to open payment options:
Initialize: start card reader (chip, tap card, tap phone).
Cash shortcuts: select common denominations; change is auto‑calculated.
Finish to finalize the order.
Step 7: Split Payments
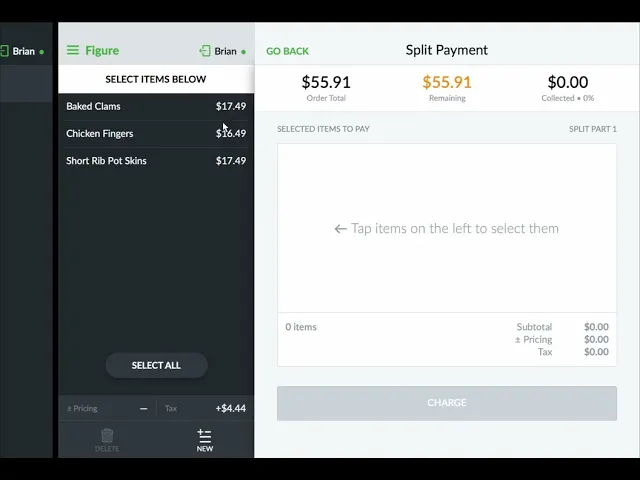
Charge > Split Pay (top right) for:
Custom: uneven splits (e.g., $30 card + rest cash).
Split Evenly: equal amounts across multiple cards.
Split by Items: assign specific items to splits.
Best practice: print check, then continue splits until all items are assigned.
Interface shows paid vs unpaid splits; charge each in sequence.
Step 8: Find Orders (Search & Filter)
Orders tab (top right): default sorted newest → oldest.
Sort any column; filter by Assignee, Source (POS, online, kiosk), Status (open), or Date (today, yesterday, future, or custom).
Search bar supports assignee, total, and order number.
If the order is older than 7 days, click Show More Orders.
Step 9: Refunds
From Orders, open the order, hit Refund:
Full Refund: entire check.
Item Refund: select specific item(s).
Split Refund: refund a specific split payment.
Amount Refund: refund a custom dollar amount.
Confirm to apply; the order list reflects partial/full refunds and remaining collected totals.
Step 10: Adjust Credit Card Tips
Method A: Orders list > open order > Adjust Tip > enter amount > hit Adjust to apply.
Method B: Figure (top left) > Operations > Tip Adjustment > bulk adjust for the day > hit Adjust Tips to apply.
Important: tips must be adjusted the same day, before the credit card batch settles; post‑settlement changes are not possible.
Notes
Order numbers are the fastest way to locate tickets in the back office and on printed checks.
Use Assignment consistently (delivery/to‑go/here/catering/custom) for reporting and handoff clarity.
Always tap Adjust (Orders) or Adjust Tips (Operations) to save tip changes.